Sous vide tri tip is perfectly cooked, perfectly tender steak that makes a delicious meal for special occasions or an everyday dinner.
The Sous vide process sounds fancy and intimidating, but it’s actually an easy way to prepare a tri tip roast.
This guide will cover the water bath cooking method from seasoning to slicing, so you can enjoy a perfectly cooked tri-tip steak whenever one catches your eye at the grocery store.
No time to read now? Pin it for later!

This post contains affiliate links, which means I receive a small commission, at no additional cost to you, if you make a purchase using this link.
So what IS Sous Vide?
The sous vide method is essentially cooking food in a warm water bath that is held at a precise temperature. This prevents overcooking because the meat physically can’t get hotter than the water temperature, and has been used in high-end restaurants for years- if you’ve seen the movie Burnt it’s the equipment Bradley Cooper’s character was resistant to using.
After sous vide cooking most meats require a simple finishing step- searing the outside for a nice crust. You can use either a grill or cast-iron skillet for that, which we’ll cover later.
And what IS tri-tip?
It is more common in grocery stores on the west coast, but it’s a triangular cut of thick steak that is often referred to as a roast. It’s a lean and tender cut of steak from the bottom of the sirloin.
Let’s get started! Here’s what you’ll need:
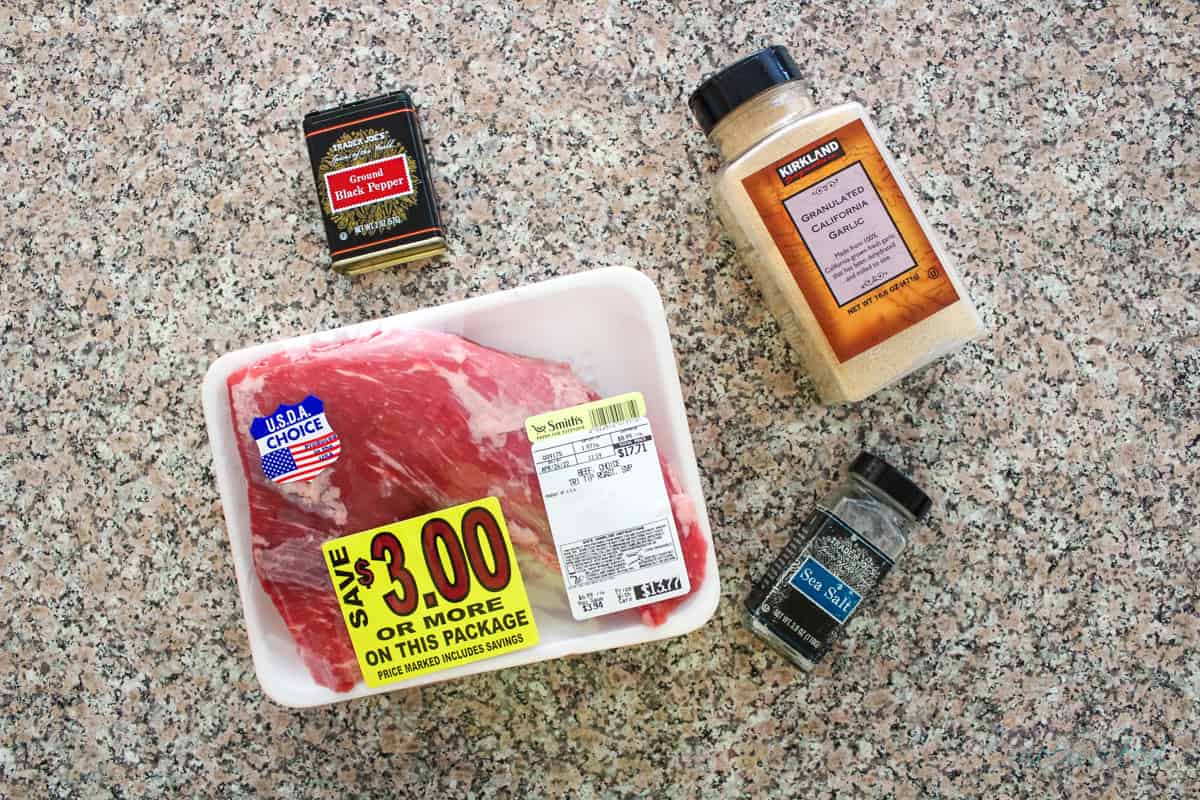
Ingredients & Equipment
- Tri-tip roast- Since tri tip is a whole muscle you'll generally find them to be similar sizes, one and a half to two and a half pounds.
- Garlic powder- you can also use your favorite seasoning blend if you prefer.
- Sea salt and pepper- these are to taste.
There are a few optional ingredients as well that can be used at the end of cooking when it’s time to sear your sous vide steak:
- Cooking oil- this is really a necessity if you're cast iron searing, but if you're using the grill to finish the meat you'll skip it.
- Smoked sea salt- often called finishing salt, this is salt that has been smoked with other flavors, generally herbs or wood.
- Butter- added during the rest, this adds extra richness to the meat.
You’ll also need a sous vide machine, a large pot or sous vide container, a gallon zip-top bag (OR vacuum sealer), knife, tongs, cutting board, cast iron pan (OR grill), aluminum foil, paper towels, and a chip clip. I know that kinda looks like a long list, but aside from the sous vide machine it’s pretty common kitchen stuff, and I try to be thorough for you so there are no surprises later.
How to Make Sous Vide Tri-Tip
Preparation
Open your package of tri-tip. You can transfer it to a cutting board or plate, but I hate extra dishes and so season it right in the packaging.
Discard any absorbing packaging under it and see if it needs trimmed. I find the prettiest side is usually face up in the package, and the side with any fat cap (top left image) or silver skin (top right image) is face down. The silver skin is a bit tough so I opt to remove it. This particular tri-tip steak didn’t have much of a fat cap, but since the low temperature won’t fully render the fat if you have one you’ll want to trim off the bulk of it.
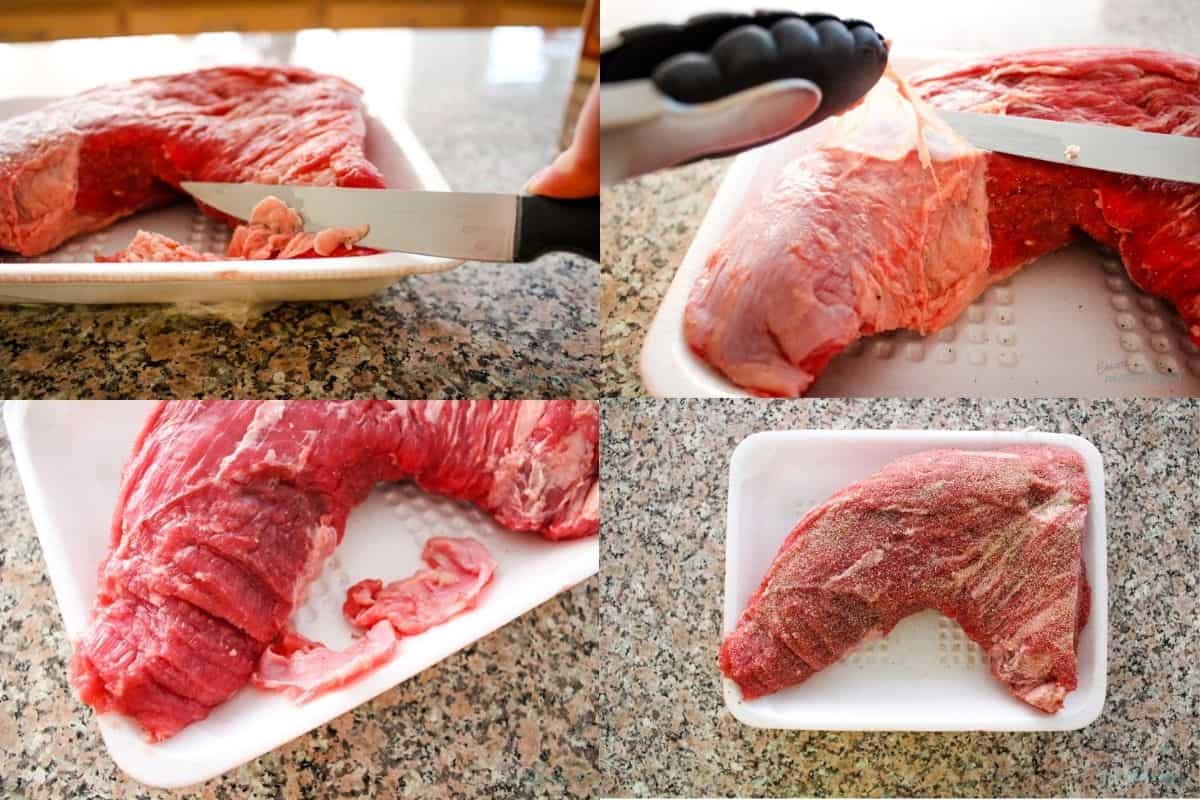
Now that we’ve prepared the roast, season it generously on both sides with your salt, black pepper, and garlic powder (bottom right image).
Air Removal- the Water Displacement Method
Transfer your tri tip steak to a gallon zip plastic bag or vacuum seal it. If using a vacuum sealer follow the manufacturer’s directions for sealing it. Here, we’ll cover the water displacement method with a plastic bag.
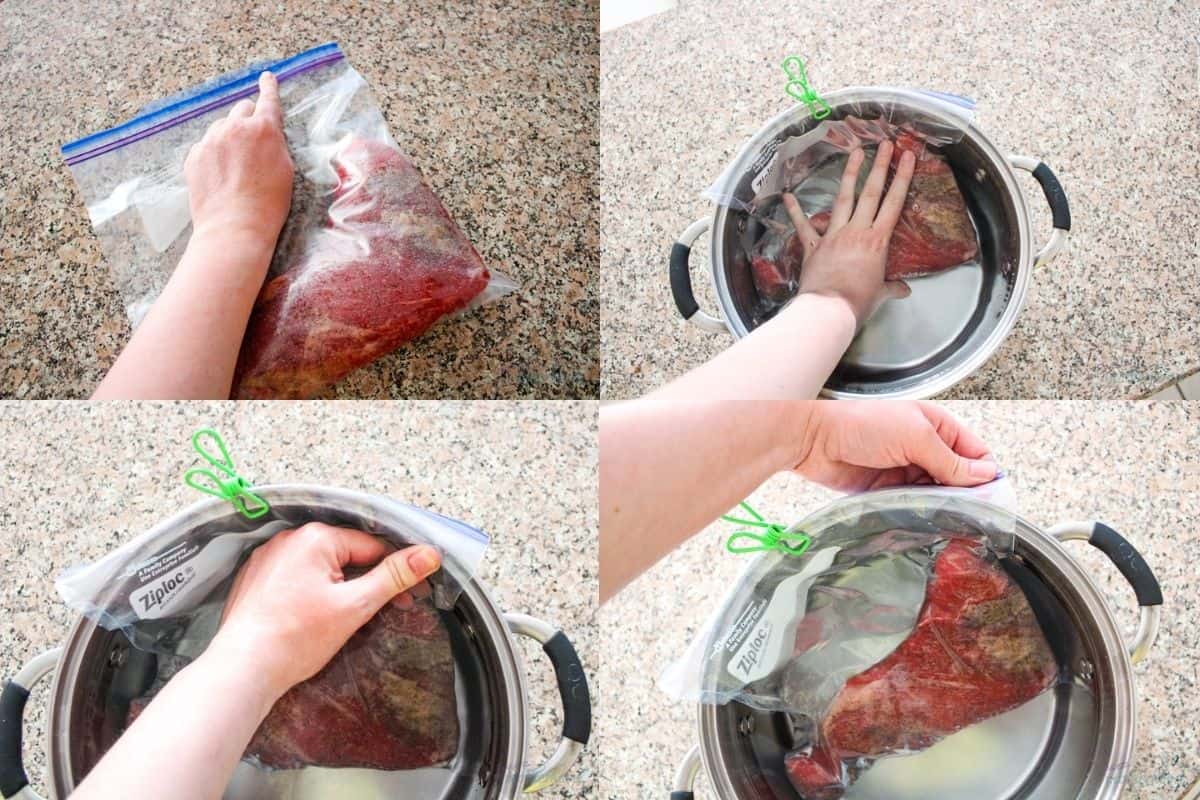
Once the steak is in the bag, push out the air you can on the counter and close the zip-top most of the way, leaving the last two inches or so open (top left image).
Fill your cooking container with water, making sure to leave enough room that the water won’t overflow when you add the meat and push it down with your hand.
Place the meat in the water and use your chip clip to secure it to the side so that the open section of the top won’t get submerged (top right image). Then, starting at the bottom of the bag use your hand to work out the remaining air around the steak up and out of the open section (bottom left image). Once you’ve removed as much air as you can and the steak rests underwater without your hand in the water, close the bag fully (bottom right image).
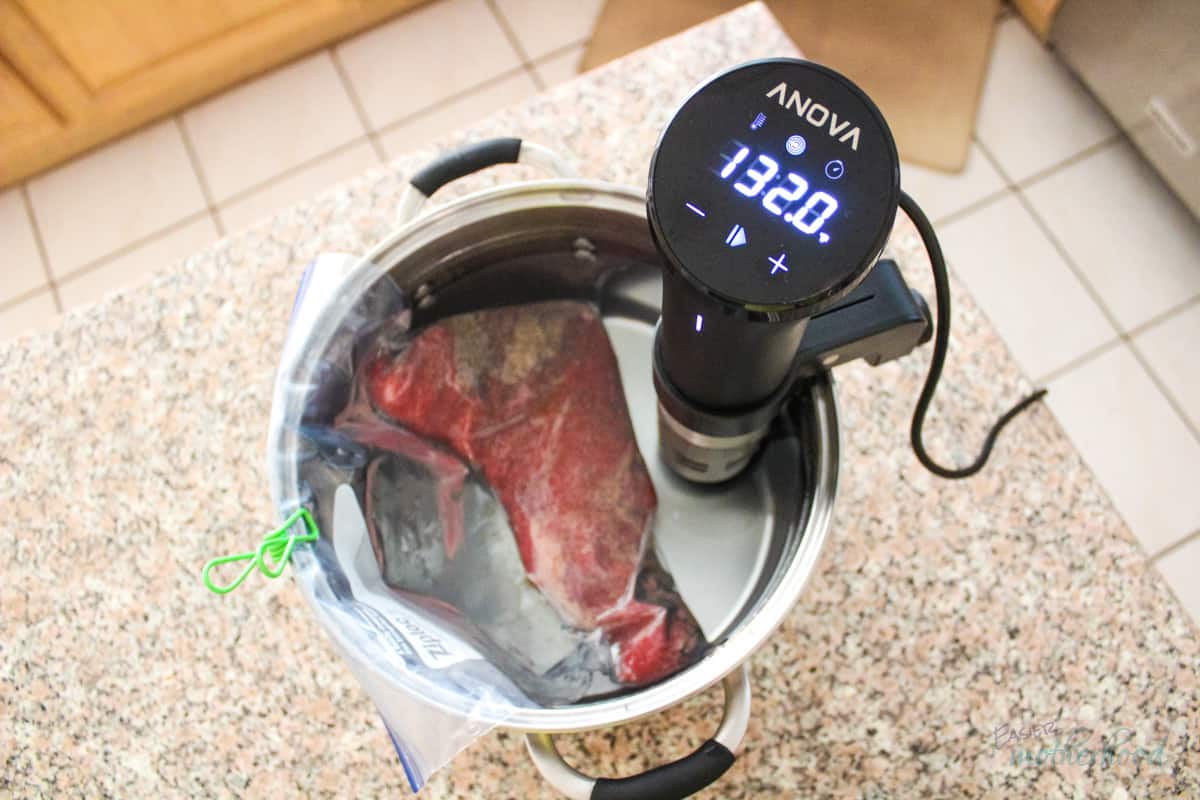
If you are using a vacuum seal bag, still clip it to the side so that it doesn't end up touching the water circulator. The clip should keep the bag from being pulled to the sous vide device's inlet. We don't want that to happen for two reasons: first, it could reduce the water circulation so that not all of the sous vide bath is the same temperature. Second, the device itself will be hotter than the water temperature, and could overcook the meat or even damage the bag.
Cooking
Cook at 132 degrees for at least 2 hours. A lot of tri tip recipes will say 6 (!) which I've tried doing, and it doesn’t make a substantial difference in my opinion. Tri tip, while called a roast, is already a pretty tender cut of meat- there just isn’t a ton of connective tissue to break down like there is with a rump or tougher cut, so it doesn't need to cook for that longer period of time. The important thing is to cook it long enough that the internal temperature of the meat reaches the temperature of the water. That said, a 6 hour cook time is perfectly fine, so if the morning is a better prep time for you then go for it!
Searing
Once the tri tip is finished cooking, remove it from the water and then the bag, and place it on a plate with paper towels to dry it. To get a good sear the steak can’t have excess moisture on it. Otherwise the steam created when it hits the hot grill or hot cast iron skillet will cool everything down and prevent us from getting that delicious crust.
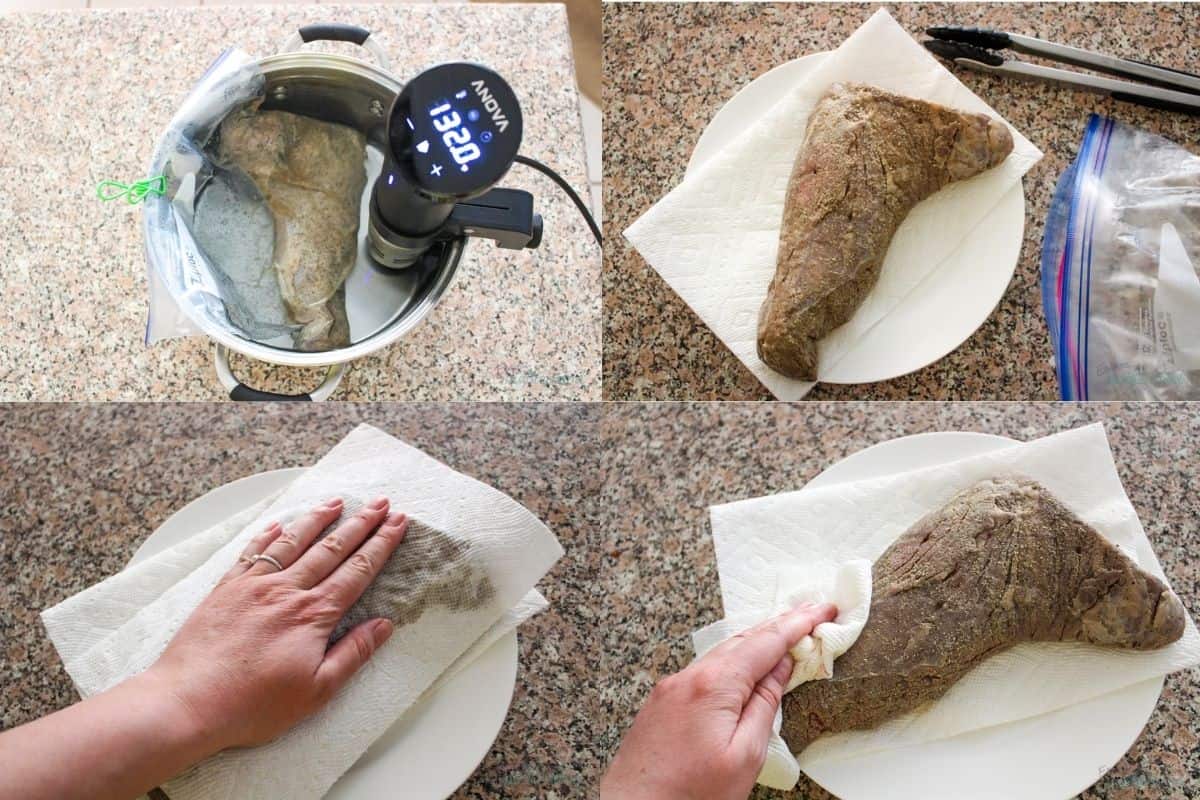
After drying, you can add your finishing salt or smoked sea salt if desired.
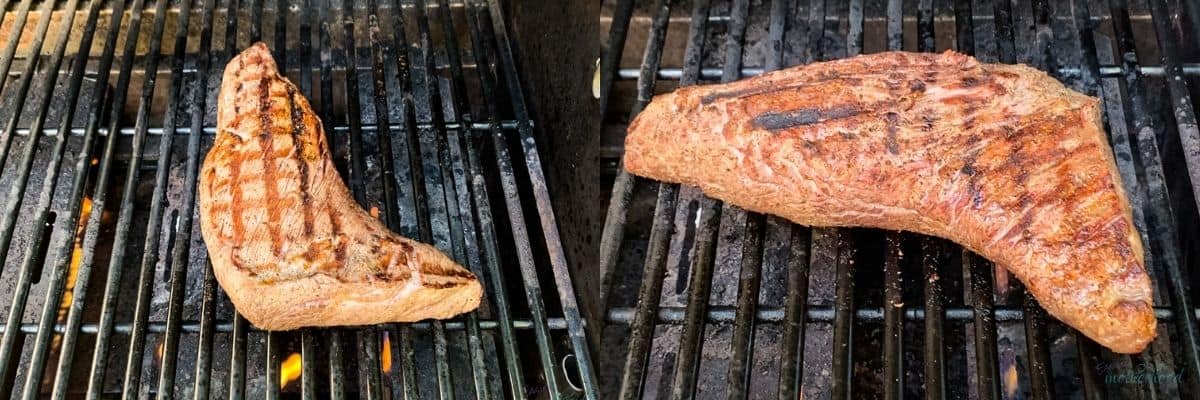
To sear on cast iron, add some oil to the cast iron pan and turn your stove on high heat. Be sure to use a high-heat oil like avocado oil instead of olive oil. When the oil is shimmering but not quite smoking, add your tri tip to the skillet. Sear on the first side for 1-2 minutes depending how much crust you want, and then flip and sear for another minute or two.
To sear on the grill, light and turn your grill to 500 degrees or high heat. Once hot, place your steak on the grill and sear for 1 minute, then flip to the other side. After one more minute, flip again, laying it the opposite direction so you get those beautiful criss cross grill marks. Flip a third and final time, again laying it the opposite direction from the first time it was on this side.
Cutting
After searing, allow the meat to rest for 10 minutes covered with aluminum foil. You can optionally add butter to the steak before covering, though I skipped that.
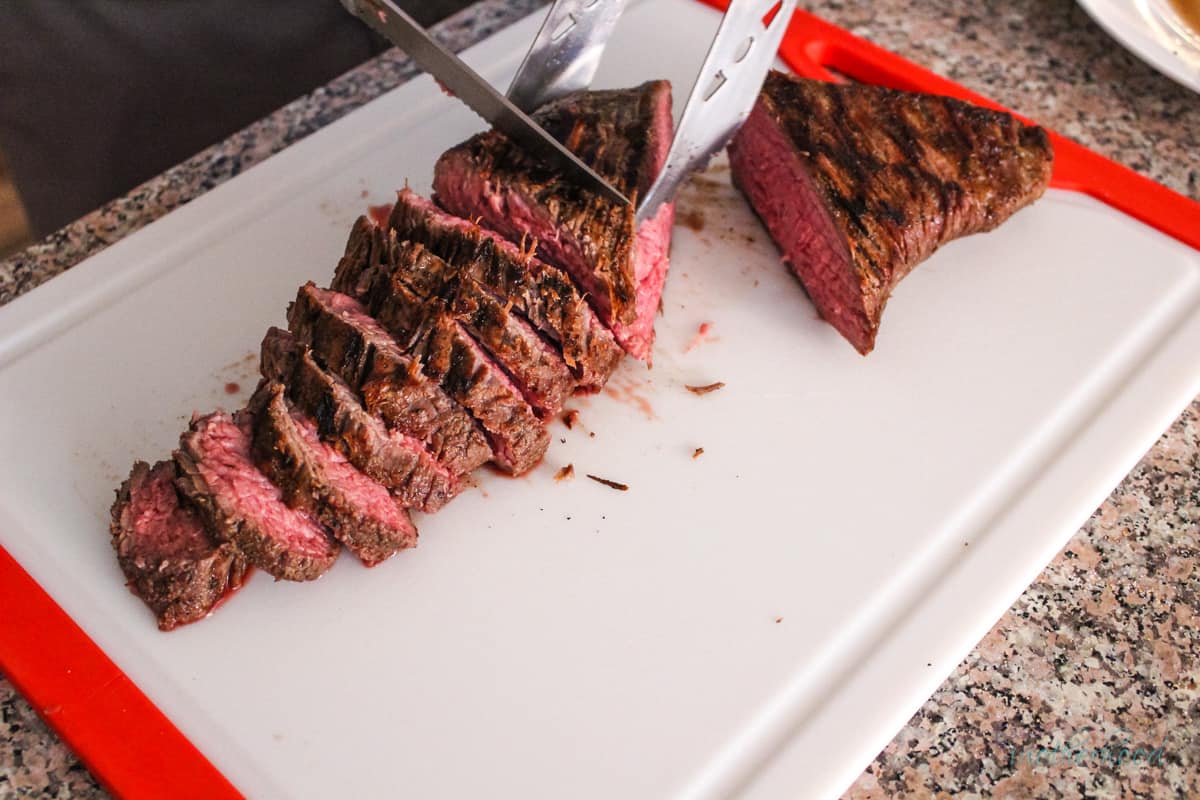
We want to cut against the grain, but with this cut of beef, the grain direction actually changes, so for best results, you’ll need to rotate your slice as you go. There are three segments with different grain directions. Shown below, the first is already sliced, the second is about to be cut, and the third is off to the side waiting to be sliced.
Frequently Asked Questions
Yes. For food safety, avoid cooking for prolonged times below 130 degrees F, but if you prefer your steak more well done you can go higher. 132 is a nice medium-rare to medium that yields a tender, juicy steak. For medium, 135 degrees is a good choice, and medium well is up to 145. Keep in mind that as you climb the temperature range you will have more juices come out of the steak and more done steak will be comparably tougher and drier.
No. You may have seen that instruction for some delicate foods like scallops, which can benefit from an ice bath. That's only because searing them can cause overcooking to happen very quickly, so maximizing the temperature difference between the pan and food is important. With tri-tip we're searing for minutes, not seconds. Furthermore, your steak may be cold on the inside if it chills too long, because the sear isn't enough to warm up the middle on a denser food like a tri-tip cut.
Absolutely! You can use these same directions with filets, beef tenderloin, sirloin steak, strip steak, basically any steak. You can also use it with short ribs and roasts, but while 132 is still a perfect temperature for those, they will benefit from a longer cooking time- 2 hours simply isn't enough to tenderize cuts of beef with a lot of connective tissue.
What to Serve with Sous Vide Tri Tip Steak
You gotta have some sides! For an all in one starch and vegetable, I'm a fan of sweet potatoes, either mashed in the crock pot or sliced and roasted.
Prefer a cheesy vegetable? Try this air fryer broccoli and cheese sauce.
Trying to keep it light and healthy so you can fill up on steak? Zucchini and squash is a great option!
What to do with Leftover Tri Tip
Tri-tip is a generously sized cut of meat, so you may have leftovers making the whole roast. Not to worry! Store in an airtight container in the fridge for 3-4 days, and use them in a sandwich or pasta! Or simply reheat it and have your tri tip as a main dish again.
Be sure to come back and let me know how your tri tip came out- what seasonings will you use?
📖 Recipe
Sous Vide Tri Tip
Ingredients
- 2 lb tri-tip steak
- 2 teaspoon garlic powder
- 2 teaspoon sea salt
- 2 teaspoon black pepper
Instructions
- Trim any excessive fat and/or silver skin from your tri tip. Season with garlic, salt, and pepper (or other seasonings of choice).
- Place beef in a zip top or vacuum bag and remove air so the meat sinks in water in the bag. Place in your sous vide container with enough water to fully cover the meat, and set your sous vide device to 132 F.
- Cook for at least 2 hours. When ready to sear, remove bag from sous vide container and steak from bag. Pat dry and sear for 2 minutes on each side, using either an oiled hot cast iron skillet or a grill.
- Cover and allow to rest for 10 minutes, then slice against the grain and serve.
Podcast
Notes
Nutrition
Nutrition information is provided as a courtesy and is an estimate. It is recommended to use your preferred calculator with the actual ingredients you use for optimal accuracy.



Leave a Reply