
Do you have an Ingenuity SmartBounce Automatic Bouncer? If so, and you're here reading this, the time has probably come for you to take the cover off and wash it.
Blow out? Spit up? They happen. Babies are messy.
Or maybe you got yours used (like I did) and want to wash it before you put your baby in it for the first time. Maybe it was in storage between kids and your first baby hated it so you never had to bother with washing it before.
When I got mine, I didn't have an instruction manual. I may be an engineer, but in the throws of sleep deprivation with a little one, it took me, well, longer than I care to admit to figure out how to remove the cover from this ingenuity bouncer.
This post contains affiliate links, which means I receive a small commission, at no additional cost to you, if you make a purchase using this link.
I don't want that for you, which is why I wrote this how-to, and even recorded a video because sometimes it's just easier to understand things that way. I'll show you how to remove the cover from your ingenuity bouncer, as well as how to put it back on. And if you're more of a video person, there's even a demonstration video at the bottom, so feel free to scroll right to that.
Step 1: Take the toy bar off the bouncer
For me, this is barely even a step, because mine pops off really easily. I may have instinctively used the toy bar as a handle, and *spoiler alert*, it isn't made for that.
If yours is a little more challenging, there is a notch on each of the two connections where the toy bar attaches to the frame. You'll want to pull it up vertically from the notch.
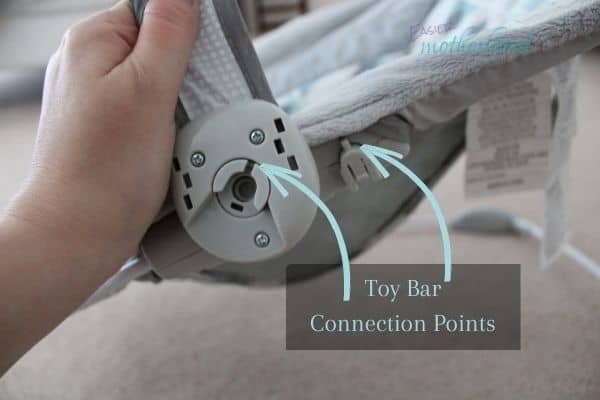
Or just try and use it as a handle. Also effective in my experience.
Step 2: Take the ingenuity bouncer's music box off
This is the trickiest part for me. There are two prongs shown below, and you need to hold them both open while lifting the music box out of the frame.

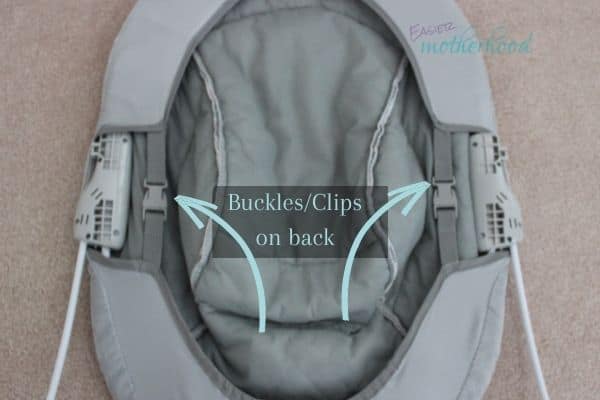
Step 3: Unclip the back buckles
This step is pretty straightforward. Buckles, clips, whatever you want to call them. Go ahead and release those.
Step 4: Remove the fabric cover from the frame
For this step I exclusively remove the fabric starting at the bottom. There's a lot more plastic to overcome at the top portion where the music box rests so starting there would be difficult if not impossible. Plus, I feel like you have more leverage pulling the bottom of the fabric.
Once you've gotten the bottom portion off the frame, you can lift the entire cover off from the top. Ta-da! You've successfully removed the ingenuity bouncer cover!
Step 5: Wash the removed ingenuity bouncer cover
We still need to wash this cover and put it back on. Sadly, this isn't as instantaneous as my imaginary washing machine in the demonstration video. Go ahead and wash it on the gentle cycle, pretreating if you need to, and then air dry your cover.
Step 6: Put cover back on the frame
Start at the top, and then use that leverage to pull it over the frame at the bottom.
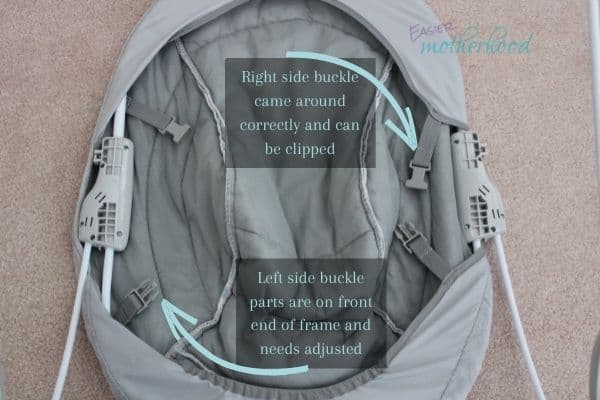
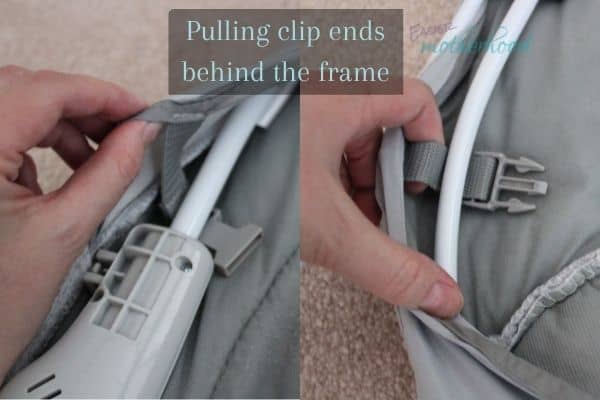
Step 7: Clip the buckles on the back of the frame
This is the trickiest part of putting it back on. And it's not really tricky, but sleep deprivation makes a lot of things feel that way. Anyhow, make sure that all 4 buckle ends are fully on the back side of the frame before you clip them back together.
Step 8: Reinsert music box into the ingenuity bouncer's frame
Line up the notches and make sure the power button is on top. Thankfully putting it back in is a snap compared with getting it out.
Step 9: Reattach toy bar to the frame
This step is optional, I know I really didn't use the toy bar since my daughter swatted it off near instantly. If you want to attach it, make sure the toys are facing out. At least on my model the toy bar is not reversible, so it won't click in otherwise. Line up the notches with the toys further from baby, and clip it back in.
Ta-done! Your ingenuity bouncer (including cover) is now ready for baby.
Prefer video instead? As promised, here's me demonstrating how to remove the ingenuity bouncer cover, and then put it back on.
What other tricky baby things could you or other moms use help with? Let me know in the comments, I'm here to help!
If you're still reading, you probably have a young baby. You might like to see how I organize my baby clothes with fabric bins inside a pack n play since running to the nursery for every diaper change and blowout well, stinks. Or the first finger painting I let my daughter do (with yogurt). Thanks for sticking around to the bottom of the page, it honestly means a lot to me.


Lizzie says
Thanks!
Anne Aslanides says
You're very welcome!