
This Christmas Rice Krispie Treats Recipe is an easy and festive no-bake dessert that brings holiday cheer! Your friends and family will love their soft and chewy texture and joyful appearance, and you’ll love how easy they are to prep. It is a must-make recipe for Christmas cookie trays and holiday get-togethers!

Why You’ll Love This Christmas Rice Krispie Treats Recipe:
- Quick and Easy: Ready in a few simple steps and only 15 minutes of active cooking time, this beginner-friendly recipe is ready in a snap!
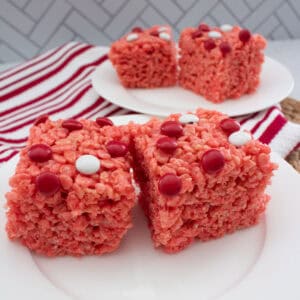
- Festive: Celebrate the holiday season with a cheery and joyful treat, complete with green Rice Krispies, Christmas-colored M&Ms, and a red candy drizzle! They’re the perfect complement to any holiday treat spread.
- Versatile: Add your own cheerful spin to this dessert with my list of Christmas Rice Krispie treat ideas. Use a different food coloring, drizzle with chocolate instead of candy melts, add sprinkles, and more!
Let’s Get Started! Here’s What You’ll Need:

Ingredients
Rice Krispies Cereal - This forms the base of the holiday Rice Krispie treats, giving them a light crunch. You will need 6 cups of the cereal. Both name-brand and generic work.
Mini Marshmallows - For melting and forming the smooth marshmallow coating that holds the Christmas Rice Krispies treats together, giving them a sweet chew. If needed, you can also use full-sized marshmallows and melt on low for longer.
Butter - Adds richness and makes the treats pliable. You can use either unsalted butter or salted butter.
Vanilla Extract - For sweet, nutty notes. If possible, use pure vanilla extract for the best Rice Krispie Christmas treats.
Green Food Coloring - You can use liquid or gel food coloring work; you will need more liquid coloring and less gel.
Equipment:
Large Mixing Bowl - Such as a 4-6 quart or larger mixing bowl. Plastic, glass, or ceramic mixing bowls all work, but plastic is the most non-stick.
Measuring Cups & Spoons - These are used to measure the ingredients. I recommend dry measuring cups to measure the rice krispies accurately.
9x9-Inch Baking Pan - For pressing the holiday Rice Krispies treats. You can use a metal, glass, or ceramic pan.
Parchment Paper - To prevent the Christmas marshmallow treats from sticking to the pan. If you're out, you can use butter or nonstick spray to prepare your pan.
Medium Saucepan - This is used to melt the marshmallows and butter. If needed, you can also use a large pot.
Silicone Spatula - For stirring and pressing the rice krispie mixture into the pan.
How to Make Christmas Rice Krispies Treats
Prepare Ingredients and Pan.
Pour the Rice Krispies cereal into a large mixing bowl and prepare a 9x9-inch baking pan by lining it with parchment paper, brushing it with butter, or both.

Make Marshmallow Mixture.
Melt the butter in a medium saucepan over medium heat. Add the marshmallows and stir regularly until they are half-melted. Add the vanilla extract and green food coloring. Stir well and add more green food coloring if desired until you have created your ideal shade of green.

Make Rice Krispie Treat Mixture.
Once the marshmallows are completely melted and smooth, slowly drizzle the mixture over the cereal, stirring gently as you pour until the cereal is evenly coated.

Form Rice Krispie Treats.
Transfer the cereal mixture to the prepared pan, gently pressing it with the spatula.

Decorate.
Melt the candy melts in a microwave-safe bowl in 30-second intervals or according to the package instructions. Stir until smooth and drizzle over the treats. Evenly top with Christmas sprinkles, M&M’s, or other holiday treat decorations.

Set and Enjoy.
Allow the treats to set for at least 30 minutes or until firm. Remove them from the pan and slice into squares.

Recipe Success Tips
- Prepare the baking pan. The cereal and marshmallow mixture will be sticky and firm up relatively quickly, so you will want to line the pan with parchment paper, spread with butter, or both before starting.
- Adjust the amount of food coloring. Add more coloring or a deeper green or if using liquid. Use less coloring if using a gel – they are less concentrated than liquid coloring.
- Don’t pack the cereal mixture. For soft, chewy treats, gently press it into the baking dish. Pushing firmly or packing it can make them hard or tough.
- Cut as desired. For large crispy treats, cut the pan into 3 rows across and 3 down, making 9 squares. 4x4 cuts (16 squares) make lunchbox-sized, and 5x5 cuts (25 squares) make these rice krispie treats Christmas cookie tray-friendly!
Serving Suggestions
Enjoy these holiday treats with a mug of hot chocolate for a family-friendly holiday snack, or plate them with sugar cookies for Santa’s treat! They’re also a great addition to holiday cookie tables, treat bags, and Christmas cookie swaps.

Recipe Variations
Adapt this Christmas Rice Krispie treats recipe to your preferences, holiday party theme, or what you have on hand by making any of the optional variations:
- Switch Up the Colors: Swap red food coloring for green or use green candy melts instead of red for a different take on the festive treats. Keep in mind green may be easier to get the shade you want, some red colorings will create pinks.
- Use Holiday Rice Krispies: Eliminate the need for food coloring by using red, white, and green rice cereal!
- Chocolate Drizzle: Melt and drizzle semi-sweet, milk, or white chocolate on the Krispie treats for an indulgent finish.
- Use Different Candies: Use your favorite holiday candy, such as mini Reese’s cups, Hershey Kisses, or icing decorations in place of the M&Ms.
- Sprinkles: Mix in or sprinkle on ¼ cup of holiday sprinkles for an extra cheery touch.
- Change up the shape: Cut these into triangles instead of squares, and you can decorate them to look like Christmas trees.
Storage Directions
- Storage: The DIY Christmas Rice Krispie treats keep covered in an airtight container at room temperature for up to 3 days. They also can be refrigerated for up to 5 days.
- Freezing: Store the treats in a freezer-safe bag in the freezer for up to 3 months. Defrost them at room temperature for 30-60 minutes or until thawed.

More Christmas Dessert Recipes
Enjoy!
I hope you love this festive twist on the classic easy treat! Be sure to come back and let me know how it turned out for you with a review- I love hearing about your kitchen successes.
📖 Recipe

Christmas Rice Krispie Treats
Ingredients
Treat Base
- 6 cups rice krispy cereal
- 10 oz mini marshmallows
- ½ cup butter 8 tbsp
- ½ teaspoon vanilla extract
- 15 drops green food coloring may vary depending on the strength of your food coloring
Toppings
- 2 oz red candy melts
- 1 teaspoon sanding sugar sprinkles
- ¼ cup holiday M&Ms
Instructions
- Place crispy rice cereal in a large mixing bowl and prepare a 9x9 pan with parchment paper, butter, or both.
- Melt butter in a medium saucepan over medium heat. Once melted, add the marshmallows and stir regularly until they are half melted, then adding the vanilla extract and food coloring. Stir well, adding more food coloring if desired.
- Once marshmallows are completely melted into the butter and food coloring evenly distributed, slowly drizzle the melted marshmallow mixture over the cereal, stirring while you pour. Stir gently until all of the cereal is evenly coated.
- Transfer the cereal mixture to the prepared pan, gently pressing it in with your spatula.
- Melt candy melts in a microwave safe bowl in 30 second increments, or per the package instructions. Drizzle the melted candy over the top of the treats, then add sprinkles and M&Ms or other holiday toppings.
- Allow at least 30 minutes to set, then remove from pan and slice into squares. Enjoy!
Podcast or Video
Notes
- Storage: The DIY Christmas rice krispie treats keep covered in an airtight container at room temperature for up to 3 days. They also can be refrigerated for up to 5 days.
- Freezing: Store the treats in a freezer-safe bag in the freezer for up to 3 months. Defrost them at room temperature for 30-60 minutes or until thawed.
- Prepare the baking pan. The cereal and marshmallow mixture will be sticky and firm up relatively quickly, so you will want to line the pan with parchment paper, spread with butter, or both before starting.
- Don’t pack the cereal mixture. For soft, chewy treats, gently press it into the baking pan. Pushing firmly or packing it can make them hard or tough.
- Adjust the amount of food coloring. Add more coloring or a deeper green or if using liquid. Use less coloring if using a gel – they are less concentrated than liquid coloring.
- Cut as desired. For large treats, cut the pan into 3 rows across and 3 down, making 9 squares. 4x4 cuts (16 squares) make lunchbox-sized, and 5x5 cuts (25 squares) make these rice krispie treats Christmas cookie tray-friendly!
Nutrition
Nutrition information is provided as a courtesy and is an estimate. It is recommended to use your preferred calculator with the actual ingredients you use for optimal accuracy.


Leave a Reply