
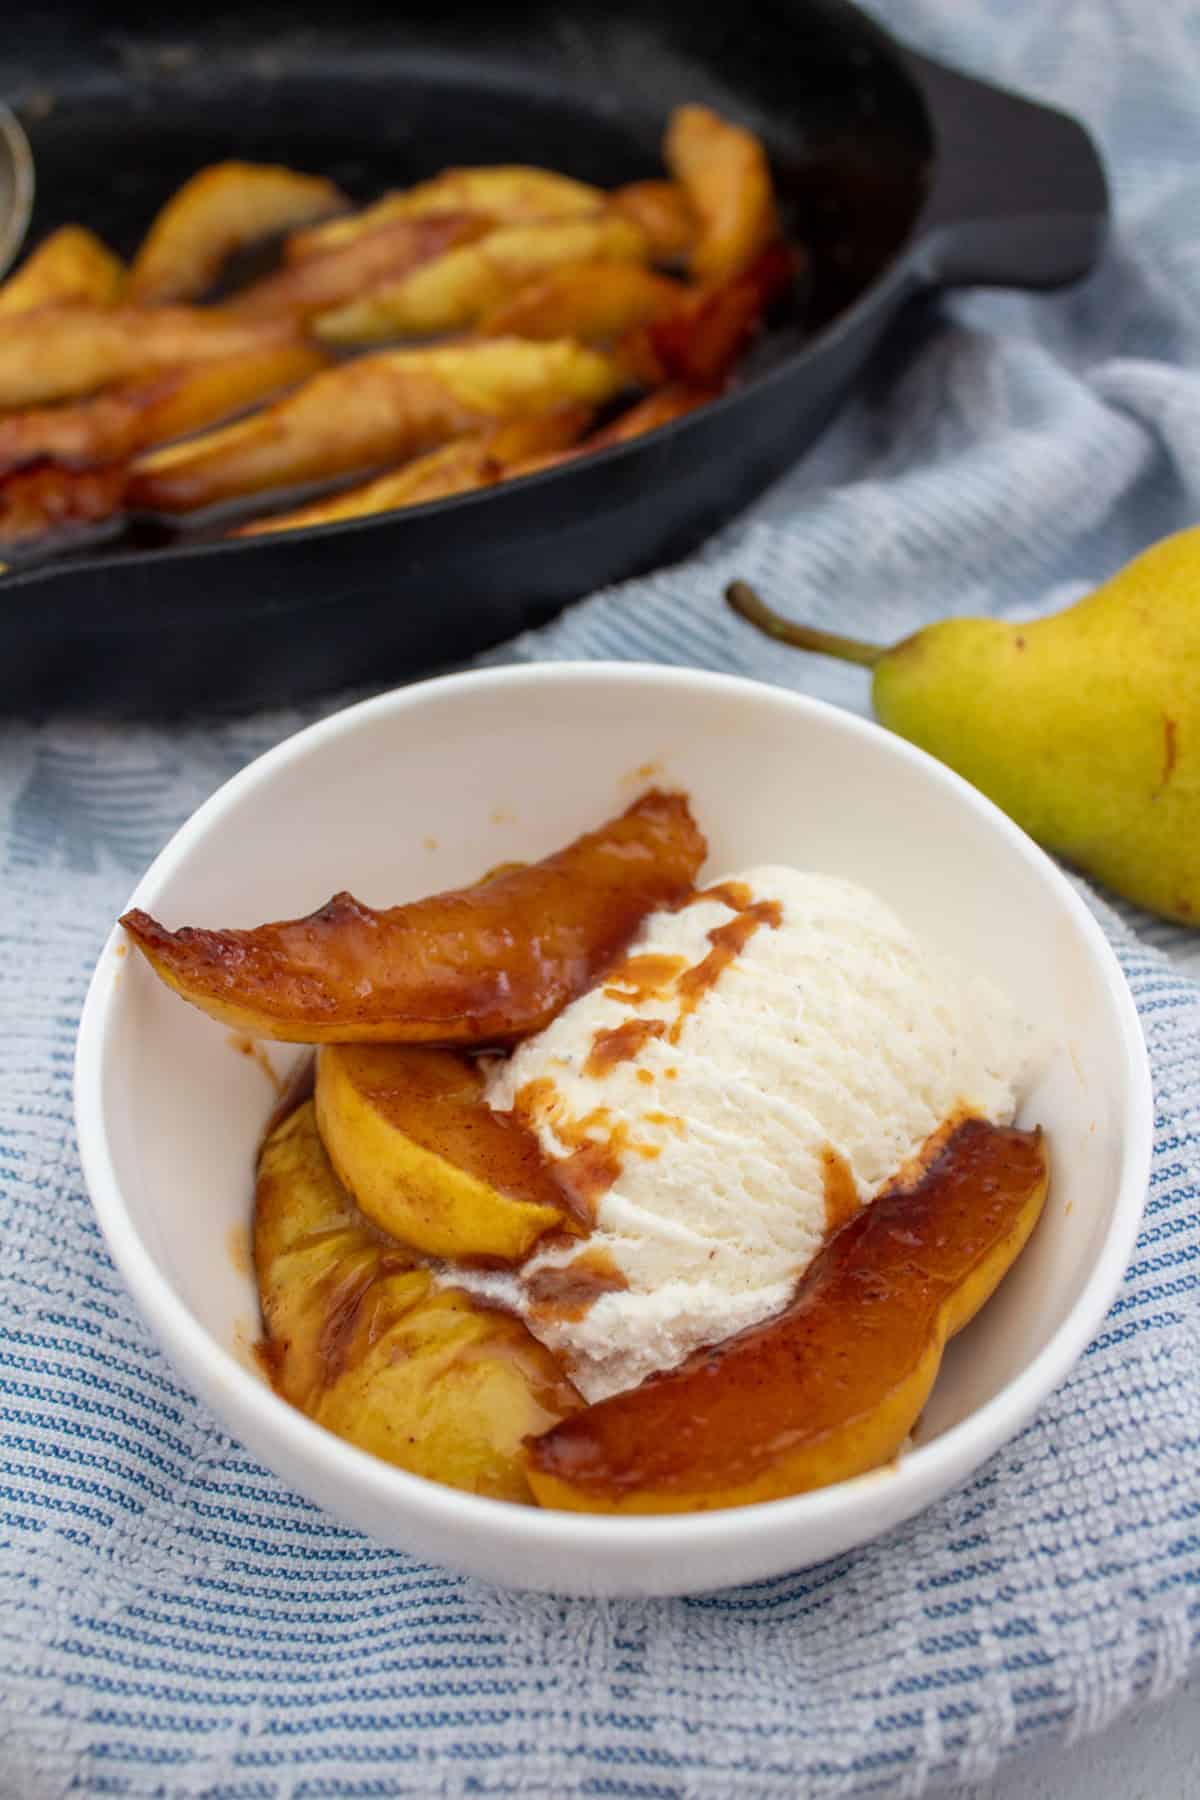
Give the fall season the warmest welcome with Caramelized Pears! Whether you’re hosting a dinner party or craving something sweet, you’ll want to keep this no-fuss recipe on hand all season. It comes together quickly with minimal prep time, and is best enjoyed with a scoop of vanilla ice cream.
Why You’ll Love This Caramelized Pears Recipe:
- Autumnal Vibes: These tender, spiced pears are the best way to welcome the changing seasons. Nothing signals fall quite like the warm scent of cinnamon wafting from the kitchen!
- Quick & Easy: If you’re wondering how to caramelize pears, you’re in the right spot. My caramelized pear recipe calls for simple ingredients and a fast prep time. You’ll have a big bowl of spiced, glazed pears to dig into before you know it.
- Fun Way to Eat Pears: Caramelizing pears turns the juicy fruit into something special, enhancing their natural sweetness with an added boost of sugar, spice, and all that’s nice.
For a more summery caramelized fruit, check out my Caramelized Peaches recipe!
Let’s Get Started! Here’s What You’ll Need:
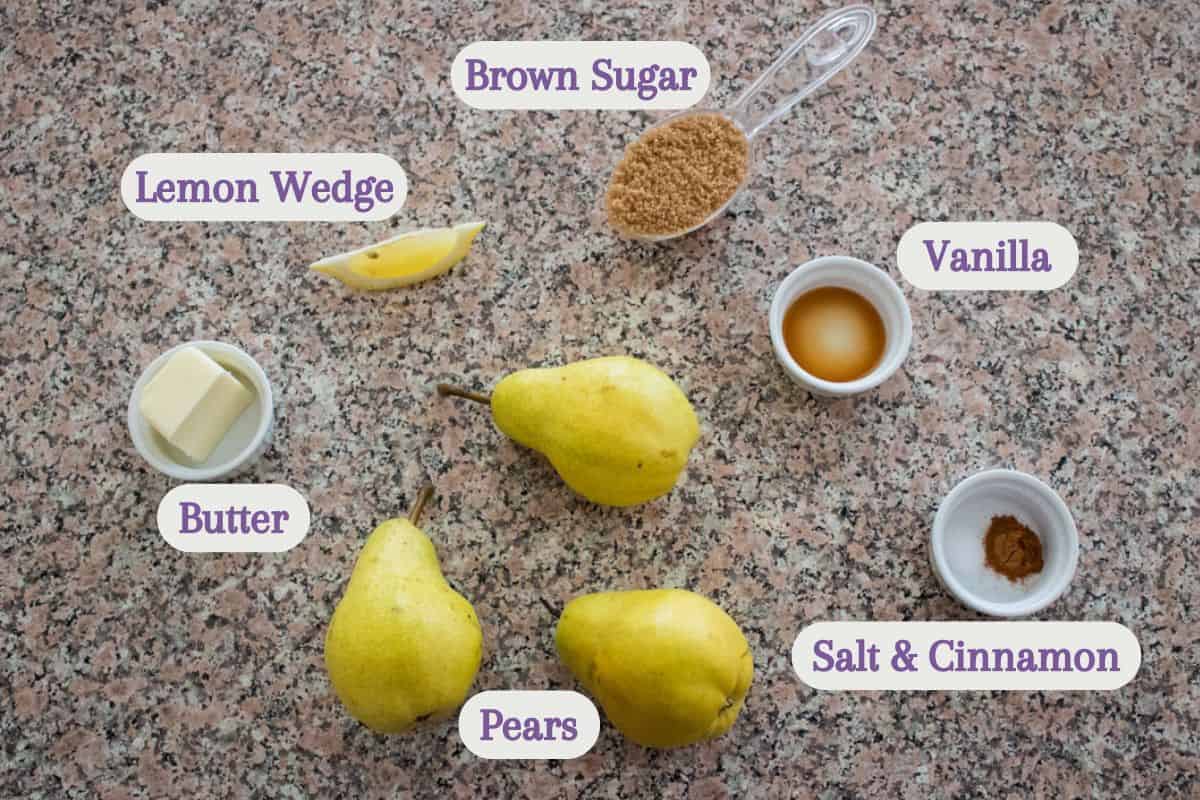
Ingredients
Pears - I used Bartlett pears in this recipe, but in truth, any pear variety will do the job, like Anjou or Bosc pears. Just make sure they are ripe!
Brown Sugar - To get that molasses-like caramelization, pull out the brown sugar! White sugar will work in a pinch, but brown is recommended for that rich caramel pear flavor we’re going for. For a lower-sugar option, cut the amount of sugar the recipe calls for in half, and use maple syrup or honey for the other half. For a naturally-sweetened dessert, use organic cane sugar.
Cinnamon - In tandem with the caramelization, the warmth of cinnamon really makes the pears pop. I just use cinnamon to keep this candied pears recipe simple, but don’t hesitate to add a variety of warming spices – nutmeg, cardamom, ginger, and cloves.
Salt - Just a pinch to balance and enhance the flavors.
Vanilla Extract - A splash of pure vanilla extract intensifies the candied pear flavor and really heightens the warm, cozy aroma.
Lemon - Specifically, the lemon juice from just one wedge. A dash of acidity evens everything out and prevents overbrowning.
Butter - Salted butter is preferred. A couple of tablespoons helps the fruit slices brown in the pan while melting the dry ingredients into that caramelized syrup. Use coconut oil instead for a dairy-free option.
Equipment:
Mixing Bowl - To mix the pear slices and dry ingredients together.
Knife - Use a sharp paring knife to cut the pears.
Cutting Board - Protect your countertops from knife markings with a cutting board.
Spatula - Choose a heat safe one for handling the candied pears on the stove.
Cast Iron Skillet - I like using a cast iron skillet, but any large skillet or frying pan will work, preferably non-stick.
How to Make Caramelized Pears
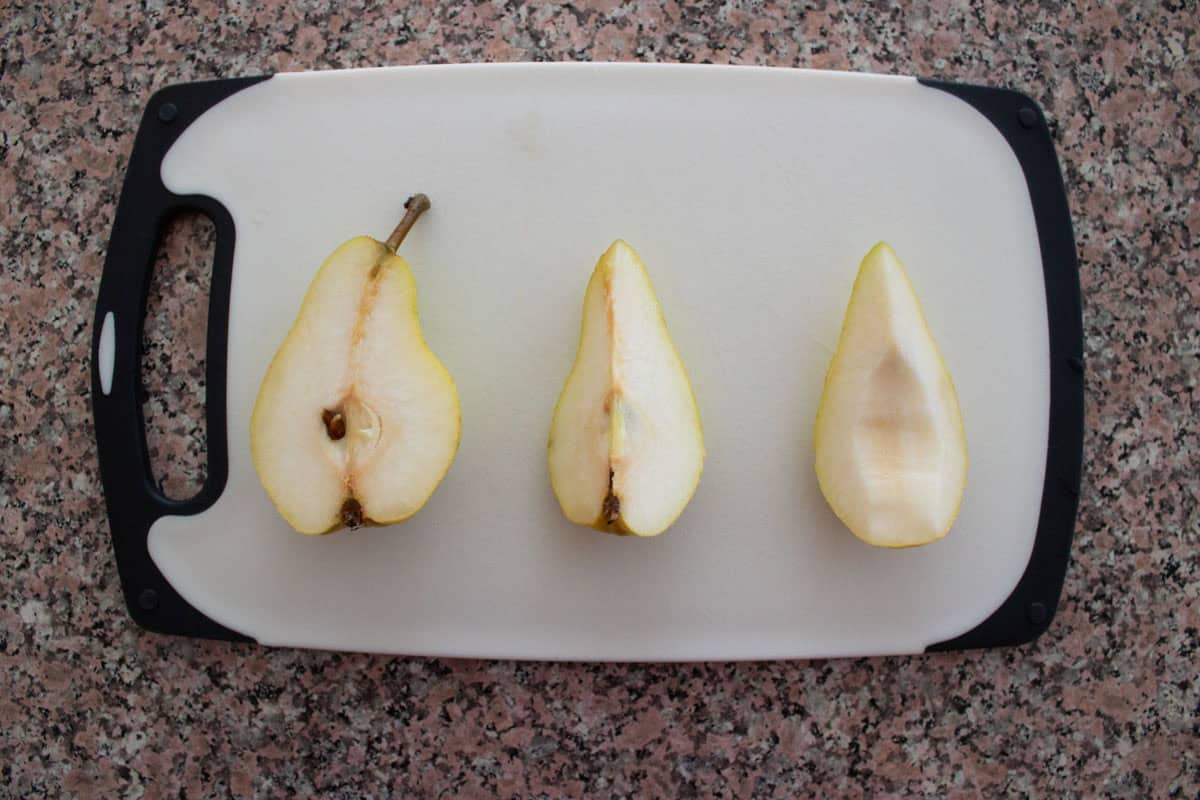
Prep the Pears
Wash and cut pears into quarters. Remove and discard stems and cores, then slice pears once more into eighths.
Combine Ingredients
Combine pears, brown sugar, cinnamon, salt, vanilla extract, and the juice of the lemon wedge in a medium bowl and stir gently until well combined.

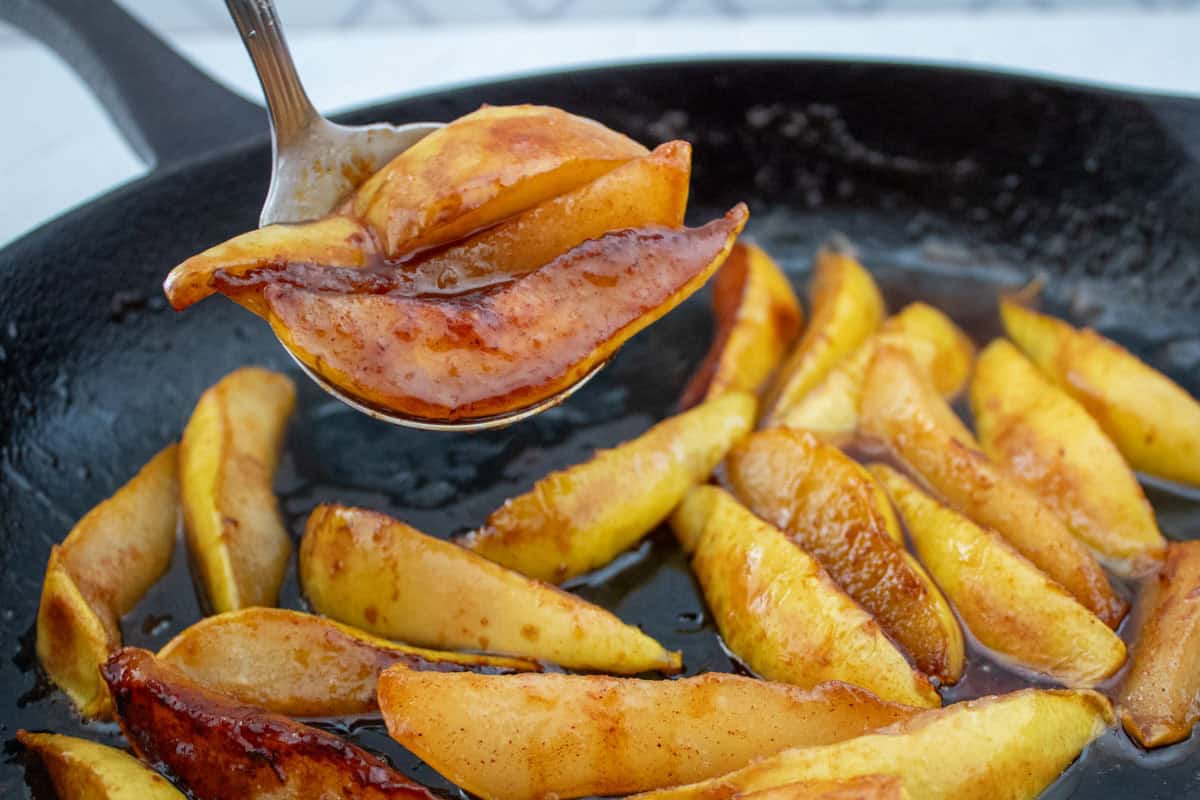
How to Cook Pears on Stove
Melt butter in a cast iron skillet over medium heat. Once butter has melted, add the pear mixture. Spread pears into a single layer and cook for 5-7 minutes, starting on medium heat and reducing once the liquid starts to thicken.

Finish and Serve
Flip pear slices and cook for another 4-5 minutes. Serve and enjoy.

Recipe Success Tips
- Use ripe pears. The perfect sauteed pear begins with ripe pears– slightly soft when pressed. Overripe pears will turn to mush, and underripe pears won’t soften.
- Cut thin pear slices. The larger the pear slice or chunk, the longer it’ll take to cook on the stovetop. I suggest cutting each pear into 8 slices to ensure they soften easily and evenly over heat.
- Place the pears in a single layer in the skillet. It’s okay if they overlap slightly, but we want each slice to cook evenly on both sides.
- Reduce heat, if needed. Stovetop heats vary. The mixture should brown and bubble, but as the mixture reduces and starts to thicken into a caramel sauce, you may need to reduce the heat to prevent scorching.
Serving Suggestions
Dress caramelized pears up or down! You can enjoy them as a snack at any time of day or served in small dishes for a yummy, charming snack or dessert.
Here are a few ideas to pear them with:
- Vanilla ice cream
- Whipped cream or Greek yogurt
- Pancakes or waffles
Storage Directions
- Refrigerator: Caramelized pears will keep in an airtight container for up to 7 days in the fridge.
- Freezing: Cool the pears completely before transferring them to a freezer-safe container and freezing for up to 3 months. Defrost the pears in the fridge overnight until thawed.
- Reheating: Warm the pears in a saucepan over medium-low heat for 3-5 minutes, adding a splash of water if needed, or in the microwave on gentle heat until hot.

FAQs
You can caramelize any variety of pear – Anjou, Bosc, and Bartlett. They are all equally juicy and will caramelize well on the stovetop. For the best flavor, just make sure they are ripe.
For a healthier option, use organic cane sugar, maple syrup, or honey instead of regular brown sugar. You can also just omit the sugar entirely and lean on the natural sweetness of the pears. However, please note that you will not get that thick, caramelized liquid that the brown sugar produces.
Enjoy!
I hope you love these whenever you make them, be it to satisfy a quick sweet tooth craving, or as an elegant dessert this holiday season. Be sure to come back and let me know how they went or what you had them with!
📖 Recipe

Caramelized Pears
Equipment
- skillet cast iron preferable
- Cutting board and knife
- measuring cups and spoons
- medium mixing bowl
- spatula heat safe
Ingredients
- 1 lb bartlett pears ripe
- ¼ cup brown sugar
- ¼ teaspoon cinnamon
- ⅛ teaspoon salt
- ¼ teaspoon vanilla extract
- 1 lemon wedge ⅛ lemon
- 2 tablespoon butter
Instructions
- Wash and cut pears. Remove and discard stems and cores, then slice pears into eighths.1 lb bartlett pears
- Combine pears, brown sugar, cinnamon, salt, vanilla extract, and the juice of the lemon wedge in a medium bowl and stir gently until well combined.¼ cup brown sugar, ¼ teaspoon cinnamon, ⅛ teaspoon salt, ¼ teaspoon vanilla extract, 1 lemon wedge
- Melt butter in a cast iron skillet over medium heat, once butter has melted add pear mixture. Spread pears into a single layer and cook 5-7 minutes starting on medium heat and reducing once the liquid starts to thicken.2 tablespoon butter
- Flip pear slices and cook another 4-5 minutes. Serve and enjoy!
Podcast or Video
Notes
- Use ripe pears. The perfect sauteed pear begins with ripe pears – slightly soft when pressed. Overripe pears will turn to mush, and underripe pears won’t soften.
- Cut thin pear slices. The larger the pear slice or chunk, the longer it’ll take to cook on the stovetop. I suggest cutting each pear into 8 slices to ensure they soften easily and evenly over heat.
- Place the pears in a single layer in the skillet. It’s okay if they overlap slightly, but we want each slice to cook evenly on both sides.
- Reduce heat, if needed. Stovetop heats vary. The mixture should brown and bubble, but as the mixture reduces and starts to thicken into a caramel sauce, you may need to reduce the heat to prevent scorching.
- Refrigerator: Caramelized pears will keep in an airtight container for up to 7 days in the fridge.
- Freezing: Cool the pears completely before transferring them to a freezer-safe container and freezing for up to 3 months. Defrost the pears in the fridge overnight until thawed.
- Reheating: Warm the pears in a saucepan over medium-low heat for 3-5 minutes, adding a splash of water if needed, or in the microwave on gentle heat until hot.
Nutrition
Nutrition information is provided as a courtesy and is an estimate. It is recommended to use your preferred calculator with the actual ingredients you use for optimal accuracy.


Leave a Reply